Drivers like cars that cut into the turn. Optimizing your camber and understanding the tire contact patch will make for a faster car that stays fast through out the race. With today’s highly engineered tires, bump stop set ups and high level competition adjusting camber for maximum grip will help you win.
Camber is simply the tilt of the tire. Standing in front of the car if the top of either of the tires tilts towards the engine it is negative camber – if the top of the tire tilts away from the engine it is positive camber. To measure camber a quality all billet camber gauge will have the perfect surfaces to provide accurate and repeatable readings.
Billet Caster Camber Gauges
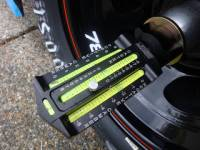 A billet caster camber gauge has the machined surfaces for accurate readings.
Camber is essential to match the contact patch to the bank of the turn balanced against your Upper A-Arm and Lower Control Arm lengths. Even if the corner were flat we would want camber. We need camber to work with the Upper and Lower Control Arms to achieve proper camber gain through suspension travel. Camber coupled with gain will optimize the tire contact patch taking advantage of the tire construction parameters.
Tire Contact Patch Explained
 For this tire contact patch exercise think of a trampoline – we are going to compare a trampoline to how a race tire works. Imagine a trampoline to create a mental illustration of how the tire contact patch is stretched. Think of the trampoline outer frame as the tire bead. Now think of the tire side wall as the trampoline springs. Compare the trampoline surface to the tire rubber contact patch and visualize how tightly and evenly the trampoline surface is stretched by springs towards the frame. Our goal is to have the tire contact patch stretch evenly and tightly just like the trampoline surface. The tire bead is very rigid and creates a sturdy frame. The side wall of the tire is a spring that absorbs loads. By using camber to maximize the power of the sidewall springs the contact patch stretches flat and stays in full contact with the ground producing more grip.
The ideal amount of camber is achieved when the inside sidewall sets into the track to provide maximum pull at the tire contact surface. The stretch pulls evenly from the inside sidewall to the outside sidewall. The correct camber setting will utilize the entire contact patch. If you have too much camber the inside of the tire will not have enough initial surface area to pull the contact patch across and the spring of the outer sidewall will not be engaged. Not enough camber and the contact patch will deform and ball up at the inside edge – the contact patch rolls up and off the ground as the inner side wall spring needs more loading.
We use pyrometers to measure the tires on the inside, middle and outside. When the pyrometer shows a hot temp on the outside of the RF we add camber. Too hot on the inside RF and we take camber out. There is an exception that goes against the common thought of taking out camber when the pyrometer shows a hot reading on the inside. When would you add camber even though it opposes the pyrometer readings? Understanding the tire contact patch will help you set the camber through the exception.
With your trampoline comparison at the front of mind visualize the RF tire surface as it rolls through the turn. Think about the part of the turn where cars choose to cut or push. At this full tire load point, if you do not have enough camber, the contact foot print will not be stretched tightly between the two sidewalls (like in our trampoline comparison) and the pyrometer will show excessive heating on the inside of the tire and the exception occurs. In this condition we add camber even with higher inside RF temps. The excessive heating on the inside generally indicates to take camber out – thinking outside of the numbers may be in opposition to typical camber adjustments.
Understanding the Contact Patch
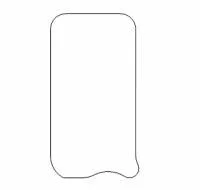 This exaggerated view of a contact patch bulge illustrates how too little camber can show a hot reading on the inside. Understanding the contact patch will help you to make the right adjustment.
You may indeed need to take out camber of the RF due to the excessive inside readings but before you do inspect the tire and look for the exception. Look for rolling at the outside edge. If you see scuff marks extending to the outside sidewall this is clue one. If the outside edge looks rounded this is clue two. Now the important clue – closely inspect the inside of the RF tire about 1” inch from the inside edge. Look for a strange wear area that is about a 1/2″ wide that looks different than the surrounding rubber. It will look grainy, be cupped or perhaps mimic wind blown sand on the desert. Remember – it is more effective to dial in camber with new tires. Worn tires may have been misused and can provide false readings. Added attention should be paid to tire temps when you bolt on a new set and high quality pyrometers should always be used. Tire Temps make the most sense when the car is close. Feedback from temps can be erratic if the car is way off.
Exception Explained
If you do not have enough RF camber inside sidewall will be under loaded. The outside sidewall gives way and folds in deforming the contact patch. The deformed tire footprint pulls up off the track surface – as the deformed contact patch reaches the inner sidewall it is forced back down creating a protruding bulge as it curves back to the inner sidewall. Remember the trampoline comparison, we need the contact patch stretched evenly from the sturdy outside bead, through the outside sidewall spring, tightly across the contact patch, through the inner sidewall to the firm inner bead. In this exception adding camber at the RF will load the inside tire wall with the ability to firmly hold the inner edge of the tire foot print. The rolling or protruding of rubber at the inside edge is due to inadequate static RF camber. Don’t be fooled by this short term and artificial temperature. The extra temperature is created from the deformed contact patch bulge as it curves back to the inner sidewall. The bulge rubber will quickly grind off permanently damaging the tire. and the true pyrometer reading will show up! Proper camber will give the inside of the tire the maximum grip allowing the contact patch to stretch trampoline tight all the way across. Proper camber will allow the outside side wall to be pulled in by the contact patch rubber connecting the inner and outer sidewalls in unison and with equal load.
Camber - Old School
Camber gain through travel is related to your static camber, your Upper A-Arm and Lower Control Arm lengths. Consider the amount of travel your front end experiences. If you have an old school set up verses a Bump Stop Set Up there is less overall travel and the Upper A-Arm will be short. With Bump Stop Set Ups there is more travel from your static ride height and much longer Upper A-Arms slow camber gain.
For a pavement touring late model old school thinking was about 1 degree of camber gain per inch of travel. This guideline was a rough starting point with traditional set up and would be adjusted as needed to actual conditions. With a 17 ¾” RF Lower Control Arm a typical Upper A-Arm would range from 7 to 8.5” +/-. The increased angle of the Upper A-Arm provided for camber gain from static to maximum load. With standard suspension travel and a static camber of 3.5 degrees negative you would achieve about 5 to 6 degrees of camber in the center of the turn. Gain would be 1.5 to 2.5 degrees of camber through travel. Every car and track is different and these ball parks give are a simple view of old school camber
Camber - Bump Stops Set Ups
Bump Stop Set Ups require Upper A-Arms to be considered in an entirely different way. Longer Upper A-Arms slow down camber gain so it is wise to measure your camber with the car on the bump stops emulating the center of the turn. Static ride height is of zero value on a Bump Stop Set Up – as soon as you reach race speed the car is down on the stops and never sees static height again until you load it back in the trailer. Since shocks with mammoth amounts of rebound hold the car down on the bump stops the ride height static camber is not even worth checking. Bump Stop Set Ups use much longer Upper A-Arms, such as 8” to 12”, yet the Lower RF Control Arm is still around 17 ¾” on a touring late model.
When using bump stops be sure to consider your A -arm lengths and angles.
The Goal
Your goal in identifying the proper camber is to find the optimal camber amount that creates maximum tension across the tire surface by equally loading the inner and outer sidewall. Dialing in the camber for the conditions will help the car turn. Too much RF camber and the inside edge will not hold – not enough and you will get balling up at the inside edge.
To set camber with your Bump Stop Set Up I would pick a repeatable ride height down on the stops that represents your best estimation of ride height in the center of the turn. A repeatable middle of the corner ride height number will make a better week to week reference point then trying to chase a ride height that varies based on how you adjust the shock body etc. For a Bump Stop Set Up I would start with 4.5 degrees of negative camber at the RF at my mid corner reference point and would not even care about static ride height camber. I would dial in the optimal camber with my pyrometer and tire inspections. I would look for consistent tire temps on short runs with new tires and longer runs with the same new tires. Adding or subtracting from my initial set up would be based on the feedback the car provides. The left front starting setting would be 3 degrees positive with the car on the stops and I would experiment there.
Tire Temp Tip
From experience my fastest cars had RF inside temps that were 10 to 14 degrees hotter than outside temps. The small amount of extra inside heat ensured that I was just reaching over the edge giving me the best shot at a fully stretched contact patch. I made sure to verify the temps on both short and long runs with new tires. The LF has less load so 12 to 16 degrees hot on the outside temp showed me LF outside tire wall was digging in with everything it had.