When I was helping my Dad work on racecars, at the age of 12, he taught me that 4 tires work better than 3 for the best corner speed. The same thought applies to braking – 4 tires work better than 2. Ensuring that your brake system is set up properly will gain you speed throughout the race. Teams that spend the time and think out the variables will beat their competition by out working them and the cost is generally effort over big dollars. Getting the most from the rear brakes will make your car faster and easier to drive. With more braking power your car will be there at the end every time.
To get the most from your brake system you will want to get the rear brakes to do as much of the work as possible. Often teams and drivers run a disproportionate amount of front brake as pushing the window on rear brakes can make the car loose on corner entry. While too much rear brake can cause entry problems, there are some basic ideas that will allow you to run more rear brake. The goal is to take pressure off the front brakes. If your car constantly has front brake rotors that are glowing red then perhaps the cure is to get the rear brakes to do as much of the work as possible. Maximizing your rear brakes is a key ingredient for long lasting speed.
Brake Balance Bar Setup
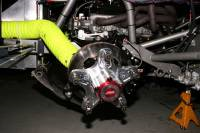 Image 1 – Feeding your brake system with cool air will help your components last and make your car faster at the same time. For this application a single hose gets the job done, but two hoses are often a good idea. The odds are stacked in your favor if you spend the time to saturate your brake components with plenty of cool fresh air.
A proper brake balance bar set is a simple place to start. Following the manufactures brake balance bar set up sheet will prevent many problems. Often I have seen brake balance bars that allow the rear master cylinder to engage before the front. When this occurs the car will be unstable on corner entry and regardless of how much front brake you dial in the car simply will not be fun to drive. Read the manufactures brake balance instructions thoroughly. You can check your car easily as the brake balance bar should be perpendicular to the frame when the brake pedal is depressed. If your balance bar is perpendicular to the frame at zero brake pressure then it is likely that the rear brakes will engage first. Whenever the rear brakes engage first you can bet handling problems that are impossible to overcome will follow.
Another common brake balance bar set up problem is proper clearance at the clevis. Refer to your manufactures instructions but in the end the master cylinder rods should be parallel and the components should have enough clearance to prevent binding throughout the brake balance adjustment range and through full pedal motion. Without proper clearance the brake balance adjuster can bind up during the race at full rear or full front bias making for a tough night.
Driving Style Adjustment
Drivers play a role in maximizing rear braking as well. Brake smashers will require more front brake bias whereas smooth braking drivers can run more rear brake. By spacing out the time between lifting off the throttle, rolling in, and then applying smooth braking pressure provides the opportunity for teams to get more from their rear brakes. Smooth drivers that are easier on tires often get the most from their brakes.
Selecting the right friction material on your pads will help you with your goal of running more rear brake. Heavy brake users almost always end up with harder pads on the front whereas smooth drivers can use softer front pads. Finding the right combination for your car, driver and brake system can be a trial and error process. You can speed the process by working with your pad manufacturer or the parts supplier at your track. Typically, your parts supplier will know what competing teams are purchasing. Your team can tailor choices based on the appropriate variables and your crew usually knows if your driver relies on heavy brake pressure. If you build your system right you can win races with a heavy braker or with a smooth driver. If you have a brake smasher encourage using less brake pressure but remember that it is hard to change a driving style.
Weight vs. Stress
Rotor and caliper size comes into play – if you run lightweight components you will build brake temperature very quickly and can over-stress undersized parts. Initial stopping force may seem fine but if you go through center on the heat range then the components become too hot and the heat is not dissipated properly due to the lack of mass. Warping and glazed pads are common results when under sizing brake components. When the heat induced brake fade occurs, the result is a natural adjustment of adding more front brake bias. For short tracks I would always choose the extra weight associated with a good brake system verses compromising braking efficiency and longevity. The weight savings offered by brake components that are too light is not worth the negative results.
Proper Brake Ducting
Proper brake ducting is a must. For short tracks I would worry less about aerodynamics and drag and focus on keeping the brakes fed with plenty of fresh cool air.
Locating your brake ducts towards the center of the nose will feed your brakes with the most air. As you move towards the outside of the nose the air moves around the car and not through your brake ducts. Mounting the brake ducts as close to the radiator opening pulls in the most air.
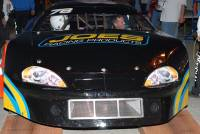 Image 2 – Pulling air from the center of the nose as close to the radiator opening as possible improves airflow to your brake system. If you place your ducts too close to the edge of the nose air goes around the car instead of through your duct work. Keeping your brake system cool is a priority over the minimal negative aerodynamic effects. For short tracks good brakes prevail over any aero advantage.
In line fans are an efficient and inexpensive way to keep your brakes cool. For short tracks fans are a must. They are lightweight and with a flip of a switch they can be turned off if needed.
Rear brake ducting is not always needed but I think it is a good idea. Fresh air to both the front and rear brakes helps the components last longer and can prevent seal damage, fluid boiling and pad glazing. As we focus more on rear braking power then proper ducting comes into play.
Braking Adjustment
Adjusting your car with a brake balance adjuster during the race can be your ticket to victory lane. When you have a tight car dialing in more rear brake can be an easy cure. A loose entry is often fixed with a few turns to the front. Selecting a brake balance adjuster that has an easy to reach handle helps drivers to make bias changes under race pressure. Adjusters with ball detents ensure that the bias adjustment stays put and the detents assist in monitoring the front to rear bias setting.
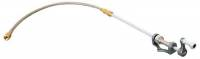 Image 3 – Using a brake balance adjuster system with an easy to reach handle and ball detents helps drivers to maintain the desired brake bias setting under race pressure. This model has heavy duty flexible connection hardware that eliminates binds at the balance bar. The lightweight construction bolts to your car fully assembled due to the mounting hole layout. Be sure to check your manufacturer’s instructions for the proper brake balance installation. Note: There is now a 12″ Hard Line, 60″ Flex Cable package available to retrofit your Brake Balance Adjuster.
Brake Fluid
Choosing high quality fluid in the smallest containers possible is another critical braking rule. As soon as a bottle of fluid is opened it begins to deteriorate. Moisture in the air reduces the boiling point nearly instantly so it is a good idea to use only new bottles when filling your system and toss out partial bottles right away. Once opened – brake fluid will never be as good as a fresh bottle.
Bedding Brakes
Bedding brakes is an often overlooked area. Rotor bedding and pad bedding are to separate processes. Be sure to clean new rotors removing any oils or foreign materials. Rotors need to be brought up to operating temperature slowly and then returned naturally to ambient temperature.
When bedding rotors I recommend taping off most of the duct work and ask the driver to bring the brakes up to temp with several stops. A few stops at easy pressure and then several at medium pressure. Just simple brake stops without being overly aggressive. Upon returning to the pits I get the car on stands and rotate the wheels every few minutes to prevent the pads from sitting in the same rotor spot during the cooling period for even heat dissipation. Proper rotor bedding will provide for longer lasting rotors and reduces the chance of heat cracking. Once the rotors have cooled completely your driver is ready to use the brakes at their discretion.
For pad bedding follow the manufactures instructions but be aware it is a needed step. Bedding pads properly cures the pads and preps them for race conditions. Bedding improves stopping power and prevents pad failures. When bedding pads on used rotors, be sure to remove the existing pad material off of your used rotors. This is especially true when changing pad compounds. A vibrating or DA type sander with medium grit sand paper will work fine. Cleaning off the existing pad material from used rotors allows your new pad material to mate to the rotor for consistent performance.
With a few minutes of time you can improve lap times by helping your car to stop efficiently. Using all four tires to get your car deep into the turns is much better than using just the front 2. By spending the time to set up your brake system correctly, you can use effort verses money to gain long lasting speed. Stop and take the time to use the braking action to help your car go.