Adjusting the Panhard Bar or J-Bar always generates feedback from the driver – sometimes good and sometimes so bad that the crackle from the driver sounds like the speakers blew at an AC/DC concert. Even on TV you hear about ⅛” adjustments during Cup races that take the driver from waving handfuls of steering wheel to driving with one hand. Of course, the same team can try to cure a small tight feeling and raising the bar the same ⅛” can make the car junk. It seems the entire chassis package revolves around what can be a very sensitive adjustment.
So why is the Panhard/J-Bar so sensitive and how come drivers can nearly always feel even small adjustments? I mean the bar is simple enough – all it does is connect the chassis to the rear housing locating the rear end laterally. It’s just a bar with a rod end on each side yet the height and angle seem to do so much.
To help understand why the Panhard/J-Bar is so sensitive it pays to think out all relationships that change based on how it is located. First off, the front roll center gets involved as the roll axis (the line drawn through the front roll center extending through the rear roll center) is affected. As you lower the Panhard/J-Bar you also lower the roll angle and the center of gravity gains leverage because the distance from the roll axis line and the Center of Gravity is increased. The result is a car that rolls more due to the leverage increase and the added distance from the CG allows for roll around an arc with what is basically a larger diameter.
As you raise the roll axis the distance from the Center of Gravity is less and the car rolls less. In this case, there is more of a direct force applied to the right rear tire. Seems so simple yet there is more to think about.
The rear spring rate controls roll so there is a correlation between rear spring rate and the Panhard/J-Bar. In essence, as you run more rear spring the effect of the bar changes – or does it? That giant sway bar controls roll as well. All the things that control roll perform their function in a somewhat progressive fashion and the timing of the control is slightly different. This is the point in the story where engineers and data acquisition get fun but since it is always my goal to remove engineering speak here there are many things to consider. Since the variables are many, the answers change depending on entry speed, banking, braking, track grip, tire grip, balance, aero and the like – no wonder engineers make the big money and are such snappy dressers.
Whenever I face many dynamic variables that change depending on when and where the car is in the corner it is my goal to find a way to simplify in a fashion that allows me to make real world changes at the track. This is where basic understanding of the hardware can help you to draw your own conclusions.
A low Panhard/J-Bar promotes roll. A high one relatively resists roll. The Center of Gravity in the car is the same regardless if you have 100 lb springs or million pound springs. Springs are progressive. A 500 lb spring compressed one inch stores 500lbs. The same spring compressed 2” stores 1000lbs. So the springs compress in roll and in squat. Great.
The Panhard/J-Bar locates the rear end laterally. In squat it does basically nothing. As an example; a drag car is designed to go in a straight line. The drag car only experiences squat (of course there is engine torque but humor me and imagine just squat). In this example you could mount the Panhard/J-Bar on the roof or on the ground and the squat will be pretty much the same.
In our cars that turn left, the Panhard/J-Bar centers the rear end on the straights and then applies force laterally as the car transitions into the corner. Based on the height the springs store energy and as we exit the spring energy is released at a rate in conjunction with the Panhard/J-Bar. A high bar transfers load quickly and a low one takes longer due to the added distance between the Panhard/J-Bar and the Center of Gravity – well at least in an apples to apples situation.
So – the result is we can change the “timing” of roll as well as the loading of the lateral force of the Center of Gravity by adjusting the Panhard/J-Bar. Fabulous – but how much and when do we raise the Panhard/J-Bar verses adding more rear spring rate? There is not an answer to this question unless your car has a 48 on the side. In the end, as you have more grip though a better racing surface, tire compound and more down force then a higher Panhard/J-Bar will transfer loads in a more direct fashion creating quick and sporty reactions. Of course track banking and car speed get tossed in the variable bucket too.
If your track is bumpy, worn out, small and has little banking then maybe you want to slow down the reaction of the car and smooth things out with a lower Panhard/J-Bar. Since I grew up in the Northwest all of our tracks were worn out and we raced on top of shiny rocks. I know I ran Panhard/J-Bars at least a full inch lower, on average, than my competition. We managed to win some and we always were good on the long run so in general a lower bar made up for reduced grip and minimal down force as most of our tracks were small and flat.
Panhard/J-Bar
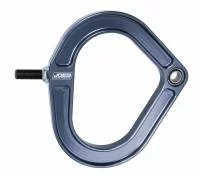 Since the Panhard/J-Bar is such an important locating device it is critical that the hardware is solid. Any flex creates unpredictable variables resulting in a car that is erratic. The hoop style shown adds rigidity and creates a solid feel for the driver.
Then we get into Panhard/J-Bar split and reverse split. There are a lot of thoughts on this topic. I hear about how teams think the rear end moves left when the right side of the Panhard/J-Bar is higher than the left. Well – the rear end is stuck on the ground and what is really happening is that the frame and body are moving to the right. Your team needs to think about the trailing arms and the rear steer in relation to the amount of split you are running. You also need to think about your shock angles. If they are perfectly vertical on your coil over car then when the body/frame moves right not much happens as both coilovers shorten by the same amount. If you have the top of your coil over tipped in then as the body/frame moves right you are losing diagonal weight as the car rolls and then gaining it as it rolls back. With tipped in at the top coilovers, if you run reverse split, the body/frame moves left and the LR shock gets more upright adding diagonal weight percentage.
Still, there are many times when you add reverse split that the car turns better even though there is potentially more diagonal through roll. The big reason is that the Panhard/J-Bar was probably too high to begin with and side bite is lost. The car skates in this scenario so lowering the bar creates more grip. More grip allows the driver to feel more secure so he can simply turn the car to the bottom instead of skating up to the second groove. Sure – you can think about how reverse split encourages the rear end housing to be pulled into the track and how standard split (higher on the right side) pulls up on the rear end housing. Last I checked gravity is the same and regardless of how uphill you run the Panhard/J-Bar so I doubt the rear tires will ever fly off the ground due to Panhard/J-Bar angles.
With standard split or reverse split rear steer comes into play. You can use rear steer to your advantage but remember to think past direction the housing moves through roll. Keep in mind that the housing goes the opposite way as the chassis unwinds and sometimes the opposite and equal reaction is more important than the intended action.
Frame side Panhard/J-Bar mount
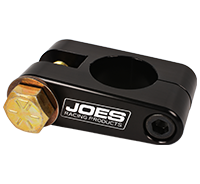 A frame side Panhard/J-Bar mount that adjusts quickly can maximize practice time ensuring you have every chance to dial in the car. The slider version allows for precision locating and increments as small or as large as you need.
Even so, there is still more to it. The goal is to get the most out of everything. Maximum down force in combination with soft tires creates an opportunity. Of course, you may have a sway bar in the car the diameter of a sewer pipe so how do we balance the Panhard/J-Bar in association with a ton of rebound in the front shocks and a sway bar that locks down the nose? Again, there is not an answer as “all” of the variables have to come together to create the right feel for the driver.
J-Bar Bracket
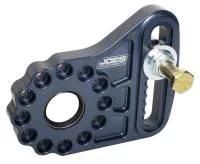 A J-Bar bracket with a slotted adjustment allows for quick changes. A wide adjustment range with slots verses holes will help your car to find every ounce of speed.
Instead of me telling you the answer to the pop quiz I prefer to write down my thought processes. It makes little difference if you agree – it makes a lot of difference that you develop a consistent system that lines up with the variables that you face. Honestly, the magic 48 has mastered this systematic approach. Sure – they make a ton of horsepower but in the end the 24 and 88 have the same junk. The 48 kids have balanced the HP with the aero, the shocks, the sway bar, the available grip and have come up with a system that allows Jimmy to run aggressive rear weight and ideal Panhard height. I don’t have inside knowledge – but I “know” that Jumping Jimmy, whether y’all like it or not, can run aggressive set ups that push out every ounce of grip cuz Sir Knaus has this formula flat figured out. He approaches the system the same way every week and eliminates as many variables as possible. The result is an edge that allows his team to be better than team mates that are in the same shop. The benefit is that Jimmy can get a little more due to the communication derived from their proven formula that features the Panhard height as a major component in their magic math.
Raise the Panhard/J-Bar when:
- There is a ton of grip available.
- When you have high amounts of down force.
- You have high banking and smooth transitions.
- When the car is solid and easy to drive deep into the corner.
- When the driver can pull down a groove at will.
Lower the Panhard/J-Bar when:
- The driver doesn’t like the corner entry feel.
- The car won’t stay on the bottom.
- The track is bumpy or has little grip.
- When the car feels fast for 2 laps then drops off considerably.
- When left side tire temps are low.
Think opposite when:
- The driver says the car is tight yet you have thrown many adjustments at the car that should have made a noticeable difference – none of those adjustments are working. This may be a time when a lower Panhard/J-Bar can add more positive rear steer through added roll helping it to turn in the center. A gain in side bite would be the goal increasing overall grip giving you new chassis adjustment options created by this new baseline.
- The car needs more side bite so the driver is timid with the steering wheel on corner entry so he misses the apex making him believe the car is tight. Pay special attention if the driver complains that the car snaps loose after being tight in the center as this “can” be an indication that lower is better.
- When you keep raising the bar to help the car turn and there is little change.
- Panhard/J-Bars are so easy to move that sometimes it pays to simply raise and lower it a small amount and just use the trial and error method.