Balanced stopping is as important as a balanced set up. To win, you need all 4 calipers doing their share of the work. Ensuring that your braking system shares the load proportionately will create a fast and stable car on corner entry. Your brake manufacturer can utilize past experience to help your team to select the correct components for your car weight, tires, horsepower, track size and banking. When I was young, my Dad taught me that 4 tires work better than 3 when it came to chassis set ups. The same holds true for braking. Getting all the tires to share the load results in faster lap times and improves consistency.
Once you have installed the correct brake system components, a brake balance bar is one of the few adjustment tools the driver can utilize right from the seat. For your brake balance bar adjuster to work properly, it is vital that you set up your pedal balance bar per the instructions provided with the hardware. For trouble free operation the pedal balance bar must be parallel to the frame rails when the pedal is full depressed. Often, teams set the balance bar parallel to the frame in the static position – this will cause binding and problematic performance. Installing the pedal balance bar parallel to the frame in the depressed position allows the front brakes to come on first promoting a stable corner entry.
After you have verified that your parts are installed correctly, you can begin choosing a brake balance bar adjuster that meets your needs. A quality brake balance cockpit adjuster will give your driver a tool that can be used during racing action.
Brake Balance Adjuster
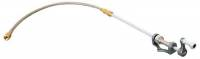 This Brake Balance Adjuster is lightweight and mounts without disassembly. The steel braided flex hose is reinforced with Nylon tubing on the interior nearly eliminating the chance of binding.
Understanding how the brake balance performs will help you to get the most out of your brakes and your driver accessible adjustments. By cranking on the adjuster you are changing the percentage of leverage force to each master cylinder. Adding front brake changes the angle of the pedal balance bar assembly. In a given amount of pedal travel – adding front brake reduces the travel distance of the rear master cylinder piston. Reduced travel equal less total braking force.
Adjusting the brakes with a brake balance bar comes with compromise. Today’s brake systems are very advanced. The small reduction in overall braking force is often a good trade off as gaining the adjustment ability can be the difference between winning and losing. At tracks that work the brake system to extremes, it is important to consider that overall braking force is reduced. If you run at the same track every week you may want to explore different brake components verses relying on the adjustment method. If you find yourself dialing to all front or all rear every week then replacing components may be a choice that allows your brake balance adjuster to be more effective.
Changing the leverage percentage to favor the front brakes promotes a solid corner entry. Getting your car into the corner in a stable fashion is mandatory for drivability and builds driving comfort. If you go too far with the front percentage then your car can exert too much force to the front tires and the car can begin to pick up the dreaded middle push. Adding front braking percentage is a great choice if the car is twitchy or uncomfortable at corner entry.
Conversely, if your car has a pushing condition then dialing more rear brake can help to set the car into the turn via the rear brake assist. More rear brake percentage can be a great tool that helps a car to turn. Use caution as going too far can create rear brake lock up should the driver need to smash the brakes to avoid an accident.
Caliper mounted Brake Pressure Gauges
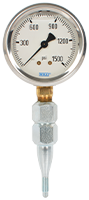 Caliper mounted Brake Pressure Gauges allow you to check the pressure at each caliper. Regular use can help you to identify brake system issues. If you see a reading that is outside your norm you should inspect your brake system to find the root of the problem
At tracks that create bright red glowing rotors your goal should be to work towards having the rear brakes do as much of the stopping work as possible. Identifying the point where too much rear brake causes unstable corner entry provides a record of the setting to avoid. Once the maximum rear brake bias leverage point is established a few turns to the front for stability will help to minimize the potential for an unstable entry. Achieving the maximum from the rear brakes takes load off the front. At heavy braking tracks, obtaining maximum safe force out of the rear calipers can prevent overworking the front brakes.
There are many brake balance bar adjuster systems on the market. Be sure to mount your version properly. Utilizing a robust flex connecter at your pedal assembly prevents unwanted binding. Steel braided versions have a rigid Teflon interior that resists binding – a guide support and a straight shot into the pedal assembly promote smooth operation.
If your brake balance adjuster system is a speedometer cable style, be sure to have a straight connection point and provide a cable guide support near the pedal assembly. Speedometer cable style units can flip into a loop rendering your adjuster useless at exactly the wrong time. Proper installation will prevent the cable from flipping into a knot. The rubberlike coating on the speedometer style cable can melt with heat. Often, the melting happens with a new car when the rubber cable sleeve is strapped to close to sources of heat. Route away from heat sources or insulate the rubberlike coated cable versions to prevent the outer coating from melting onto the cable.
Driver brake adjustment, used properly, can be the final touch to get the last ounce of speed from a good handling racecar. Further, cockpit brake adjustment can help drivers to adjust to changing track conditions or wearing tires.
Gain can come with pain. Over use of the brake adjuster can cause teams to chase their car handling characteristics. If you think of the brake balance adjuster as a fine tuning tool you will rely on chassis adjustments to balance corner handling – keeping the balance adjuster in the center of the range when the green flag drops provides the maximum adjustment ability during the race. Starting the race with the pedal balance bar perfectly parallel to the frame in the depressed position puts your brake system in the center of the range and provides maximum braking force.
Measuring Scale
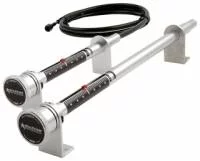 Brake Balance Adjusters with a measuring scale make recording your setting an easy task. You should record your brake balance setting as a routine part of your set up process.
Recording your brake balance adjustment should be a weekly routine. You can measure the setting with a cockpit adjuster system that utilizes a scale to indicate balance position. Another option is to track the amount of turns front or rear “off of center”. If you count turns you simply record the number of adjustment turns with center being the pedal balance bar being parallel to the frame when depressed. For more accuracy, you can use calipers to measure the pedal balance bar location by measuring the master cylinder rods before and after each race.
Dash Mounted Brake Pressure Gauges
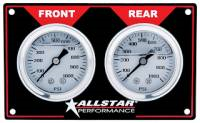 Dash mounted Brake Pressure Gauges give you a quick reference to witness the line pressure difference created with just one turn on the Brake Balance Adjuster. Dash mounted gauges can give you an early warning to braking system leaks or problems.
You can utilize brake bias pressure gauges to witness the affect of turning the brake balance adjuster. Just one turn can make a significant change on the bias gauges. Understanding your bias gauge readings can help you to establish a baseline for your brake set up. Keep in mind, that pressure is just one element in your braking system. Variables such as piston size, quantity and master cylinder size must be taken into consideration. A brake bias gauge set provides an easily viewable baseline helping you to leave the shop ready to go – or should I say stop?
As with any adjustment, it is only good if you can repeat the change in a consistent and predictable fashion. With the proper hardware, your team can eliminate problems and orchestrate a bias towards winning.